
This page explains how to set up Microsoft Outlook 2010 to send and receive e-mail for an e-mail mailbox you’ve created.
These instructions create a “POP” connection using SSL security. If you prefer to create an “IMAP” connection, see our Outlook 2010 IMAP settings page instead.
Before you continue, you should enter your e-mail address (the address you want to set up in Outlook) in the box above. Entering your e-mail address makes sure that the instructions below are correct.
1. Start the Microsoft Outlook program
Use the Start menu to start Outlook 2010. If you’ve never used Outlook before, it will prompt you to create a new account. In that case, skip ahead to step 2.
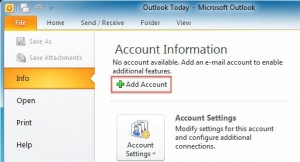
If you’ve previously used Outlook and it doesn’t prompt you, click the File tab, then the Add Account button:
2. The “Auto Account Setup” screen appears
When this window appears, leave the spaces empty, choose the Manually configure server settings or additional server types option, then click Next.

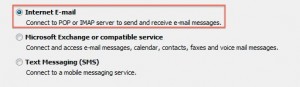
3. The “Choose Service” screen appears
Choose Internet E-mail, then click Next
4. The “Internet E-mail Settings” screen appears
This is the window where you’ll enter most of your account settings. You want the window to look like this:
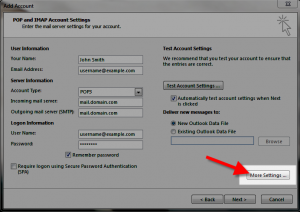
Below is a description of the fields:
| Option | Description |
|---|---|
| Your Name | Enter the name you want people you email to see, such as: John Smith |
| Email Address | Enter your full email address, such as: [email protected] |
| Account Type | Choose if you want to use POP or IMAP. By default, POP downloads and removes your emails from the server, while IMAP leaves them on the server. Here is a link to an article that explains the differences in more detail. In my tests, I am setting up a POP account. |
| Incoming mail server |
Standard settings: mail.domain.com (Replace domain.com with your actual domain)
SSL Settings: secureXX.inmotionhosting.com (Replace the XX with the numbers from your server name)
|
| Outgoing mail server (SMTP) | Standard settings: mail.domain.com (Replace domain.com with your actual domain)
SSL Settings: secureXX.inmotionhosting.com (Replace the XX with the numbers from your server name)
|
| User Name | Enter your full email address, such as: [email protected] |
| Password | Enter the password you for this email address. |
| Remember password | I recommend checking this box, so Outlook will save your password. |
| Require logon using Secure Password Authentication | Do not check this box. |
5. View “More Settings”
Click the More Settings button. A new “Internet E-mail Settings” window appears.
6. Choose the “Outgoing Server” tab
In the “Outgoing Server” tab, check My outgoing server (SMTP) requires authentication and make sure Use same settings as my incoming mail server is selected:

7. Choose the “Advanced” tab
Click the “Advanced” tab, then:
Enter your settings, below is a description of the available options.
| Option | Description |
|---|---|
| Incoming Server |
Choose your preferred settings, below are the available options.
Standard (POP3): 110
Standard (IMAP): 143
SSL (POP3): 995
SSL (IMAP): 993
|
| This server requires an encrypted connection (SSL) | Click this if you are using the SSL option. |
| Outgoing Server |
Standard: 25, 2525 or 587
SSL: 465
*Often times, ISP’s will block this port for use with their email. You may want to consider using port 587, or the secure settings.
|
| Use the following type of encrypted connection: |
Standard: None
SSL: SSL
|
8. Close the “Internet E-mail Settings” window
Click OK to close the “Internet E-mail Settings” window. The “Add New Account” screen will still be visible.
9. Test the settings
Click Next. Outlook will test the settings, then should tell you that “all tests completed successfully”:

If Outlook tells you a test failed, double-check to be sure you’ve entered the settings correctly.
10. Finish the wizard
If the “Test Account Settings” window is still open, click Close to continue.
Click Finish to finish the wizard.
Outlook setup is complete
You’re finished! Try sending yourself a test e-mail message to make sure it works.